About Me

My photo
I'm Alma, I'm the mother to 2 beautiful boys and a gorgeous little girl. I love God, scrapbooking, shoes, sunglasses, purses and shopping.

My Blog List

Weight Loss 2012

  • 8/1/12- 177.3
  • 8/8/12- 175.0

My Pinterest!

Follow Me on Pinterest

Proud Circle Member!

Grab my button!

Blog Hop
Powered by Blogger.

Thursday, December 30, 2010

First Birthday card

Hey! Well, I don't know about you but I subscribed to the new Cricut magazine (the online version) and I LOVE it! So much so that I got to the birthday party page and this centerpiece just called out my name! LOL. My husband's cousin's daughter turned 1 yesterday and I needed to make her a card and thought this was the most adorable idea!

I added my own little twist, by using a "stamp" shaped background, different patterned paper, my Imagine (Better Together) for the cupcake and Don Juan for the number 1. I then glittered my number 1 using my Xyron and MS Onyx glitter. I faux stitched the edges and voila! My card was done. I made my own envelope as well using the MS score board *BEST THING EVER!!* and I stamped the cupcake using My Pink Stamper's Simply Sweet (?) stamp set. (I'm sorry, it was one of her first and I don't remember the name specifically.) I've never really gotten into stamping but it truly does add that little cute touch to it! I decided to make a little "seal" using my Imagine. I print and cut the present from Better Together at 1 1/2" and ran it through my Xyron.

Hope you guys liked this! I can go through little "funks" and not care to use my Imagine as much, but then I get into the groove again and all of a sudden I fall in love with it each time I use it...LOL.

**Don't forget to enter my iRock giveaway post here and to vote for my little Julianne if you so choose! I have included both links under the pics!**


**Don't forget- Julianne's link changes each day as she moves up in the ranks so this link is good for Friday 12/31/10**

Giveaway post!

Vote for Julianne here! (Friday's link!)

Friday's link to vote for Julianne!

Here ya go! She moved up to #17! Yay! :-)

Julianne's friday link! Vote here!

Thank you guys SO much who have voted for her! Don't forget to enter the giveaway in the post below!

Wednesday, December 29, 2010

Giveaway!!! and other stuff!! :-)

Hey guys!! I hope you all had a wonderful and great Holiday! We sure have! I wanted to ask you all a great big favor! My daughter Julianne (who most of you have seen as my little "model" for the onesies I've made her) is entered in the Cute Kid Child of the week contest and I would truly, from the bottom of my heart, appreciate if you could vote for her!! Since her placement can change daily, it's also important to vote every single day to get her to the top! I sincerely appreciate it!

And to show my appreciation and excitement over her advancing daily and the upcoming new year, I'd love to have a New Year's Giveaway!! (Now, don't think this is bribery! lol. All you have to do is leave me a comment under this post with a way to reach you! You DO NOT have to vote for Julianne, but I would very much appreciate it and you do not have to be a follower. This giveaway is open to everyone! :)

The blog candy is: iROCK tool with jewel set!


Like I said- you DO NOT have to vote for Julianne as this giveaway is open to everyone OR be a follower but I sure would appreciate either/or! LOL. Just leave me a comment under this post with a way to reach you and that's that!
As always, if you'd like any extra submissions into the giveaway, just post it on your Facebook or blogs and let me know!

Here is the link to Julianne's page! It changes daily so I will keep "reminding" you all of her new link each day! THANK YOU SO MUCH!!!!!!!

Vote for Julianne here! Thursday's link!

Saturday, December 25, 2010

Video- How to Glitter :)

How to use your Xyron machine to glitter your cuts :)

Monday, December 20, 2010

Cricut-less layout

Hey guys! Sorry I've been a little MIA...I've been super busy with the kids and school so didn't have much time but I managed to get some time to put together a super easy and super simple layout with no Cricut! lol. I love my Cricuts but sometimes I get burned out so I will create something without a cut. All I did in this layout was use a punch out pad I got on sale at Joann's for $4.97 for the background paper, bracket backgrounds, So Beautiful embellishment and journal tag. The title was made using pink glittered Thickers (I LOVE them!) and that's it! Hope you enjoy :)


Tuesday, December 14, 2010

Sugar and Spice Layout and some TIPS i've learned along the way...

I am EXHAUSTED. My sister in law took me to a small scrapbook store that she loves (and now I do too) about 2 hours away and let me tell ya, it ain't easy traveling with 2 babies! (She just had my little niece about 6 weeks ago). Luckily, they were happy enough to enjoy the ride there and let us look around and browse. It's such an adorable store and it has so much stuff! They specialize in mini albums which I adore. (I actually made one and bound it on my Your Story...I will try to have that video up tomorrow!)

While I was making this layout, I started thinking of some tips I have found along the way since I have started scrapbooking. The first tip I have for you is DON'T WASTE YOUR PAPER! Seems obvious right? But let me explain really quick. I LOVE background cardstock on my layers. If you notice, I tend to use a lot of borders but my trick is that I actually cut out my borders from the 12x12 and adhere the smaller patterned paper on top of it so that it gives the illusion that there is an entire 12x12 background when in reality there isn't. (DON'T MIND MY GLUEY AND MESSY MAT IN THE PICS!!)

Step1: Cut out by starting your cut at 1"-11" on each side.


Step2: Cut out a second border, this time at 11x11.


Step3: Then you can add your patterned paper (I usually go with a 10x10 as I did on this layout) and you've got a background that looks like it's been matted 3x! ;)


Oh and here is what the back looks like once it's all done:


The squares that you cut out of the middle (since no one would ever suspect they are missing since it would be covered by a different cardstock) can be used for other parts of your layout such as other mats, embellishments, etc :)

That's my tip for today! Save paper and $$...I have to watch my budget now so this helps me get the most out of what would have been wasted paper anyways.

This layout is semi- scraplifted from a layout I saw on the Circle Blog but really has a lot of my own stuff to it. The title is Sugar and Spice from the Once Upon a Princess cart and that little cupcake was colored in by yours truly, then I put some glossy accents over it. The crown is colored in with Stickles and the Sweet sentiment stamp on the bottom is from a $1 stamps :) I used a white gel pen to make some embellishments on my letters and the background quarter note image is from the Imagine Best Friends cartridge. That is by FAR my favorite image ever! =) The pic was chosen for this layout because my little girl can be so sweet, but she has her sassy side already! :)


Hope you enjoy!

Saturday, December 11, 2010

Holiday Wishes Blog Hop!

Welcome to the Holiday Wishes blog hop hosted by Kathryn over at Warm Family! If you happened along this hop through my post, make sure you start over atWarm Family so that you don't miss a project! =) If you came from All Things Crafty then you are in the right place!

For my Holiday projects I decided to make a layout of my daughter wearing a Santa hat for the first time ever and a few cookie boxes which will be given as gifts to my sons' teachers and bus drivers.

The layout is 12x12 using DCWV Holiday pack from last year, Hello Kitty Font for the title and Best Friends Imagine layout for the scalloped (?) background cut that my journaling is on and of course, a little 3D Santa Clause sticker :)


I got the idea for the gift boxes from Mary over at Cardz TV and she has a GREAT
tutorial on how to put them together. Click here for Tutorial! They came out perfect size for cookies and that is what we intent to hand them out for! The gingerbread ribbon was purchased at the dollar store (yay!) and for the other box, I had to use my favorite color becuase I still like having a Pink Christmas! =)


Hope you've enjoyed my projects! I absolutely LOVE the holiday season and of course, all the opportunities to be creative!

Now hop on over to Lisa at Cricuting with Lisa!

Friday, December 10, 2010

Your Story Photo tag book

Today for our SweetSassyDiva design team challenge, it was mini book week! So I busted out my Your Story Photo and came up with some small ideas :) The first is a recipe book for my desserts and the other is a Christmas tag book! Hope you enjoy!

Thursday, December 9, 2010

Back to School layout-Take 2 :)

I had to redo my original Back To School layout for last year because after I completed, I realized that I hadn't taken the bottom 1" off the background paper so therefore, it didn't fit into my 12x12 album. So it's been sitting in the back of my scrapbook with no page protector until today. I went into our LSS and found THE CUTEST school paper and with that, of course, I got to work on my take 2. The background is corkboard background paper from Hobby Lobby and the chipboard letters are the extras left from my Christmas Cuties layout and I did save the bus and border on the bottom from my previous layout which is why the bottom corner is all bent and which you can find here: Back To School challenge

Tuesday, December 7, 2010

Educational Tuesday :)

As most of you know, my youngest son is on the low functioning end of the Austism Spectrum and my oldest has Aspergers. One of the main reasons (beyond my LOVE of scrapbooking) that I finally decided to invest in a Cricut a few years back was because I wanted to make flashcards and educational stuff for my boys. Well, for Christmas my dad bought me a laminating machine so today I FINALLY got to work on some flashcards! =) I kept it simple as my oldest is learning how to read so I wanted to focus on letters so I cut the pink background at 3 1/2x 2 1/2 with the letters being cut out at 2" using Mickey Font. I then ran them through my laminating machine (3M brand) and used my WRMK Crop a Dile to punch holes to put my ring through. THATS IT! I'm so excited because tomorrow i'm gonna start working on picture cards for my youngest (Brad) and put some magnets on the back and place them on the fridge! I'll post those up next Tuesday. :)

**And in case your wondering why they are PINK when my son obviously doesn't care for that color is because these will also be for his little sister once he "graduates" from them. Also, the laminating isn't perfect, but for a $30 machine, i'm not complaining :)**


Monday, December 6, 2010

Christmas Cuties layout

**This is THE LAST time I change my heading! LOL. PROMISE!**

**Thank you SO much to those who have responded to my request for cards for my sis, I'm so appreciative!**

Remember a few posts down how I said that I could NEVER get my middle son to take a pic? Well guess what? I got him to take a pic, WITH A SANTA HAT AND SMILE!! Yipee!! I'm so stoked because this kid rarely stops for enough time to hit click, but I absolutely adore his picture. (As I do of my oldest son as well!) =)

I don't know about you, but I LOVE sketches. I can spend hours googling layout sketches and I take the time to download onto my computer, then Gypsy because sometimes I just don't want to deal with how to arrange my pics and embellishments. So I let the sketches do the work! hehe ;) So for today's sketch, I followed a circle patterned one. (I'm sorry, I don't know who to give credit for this one but if I find out who, I will link them.)

Here is the sketch:


And here is my page:


The Santa hat was cut from Jolly Holidays at 4" and I used glitter and embossing powder on it to enhance it. Glitter is messy but I LOVE IT! =)


As you see, not as much going on in my layout but I just couldn't take too much away from the pictures because I think they speak for themselves. I also added a bit of faux stitching around the edge of the 12x12 black cardstock and used some $.99 chipboard letters from Target for the title Cuties.

Hope you enjoy it and have a great Monday!

Sunday, December 5, 2010

My personal Card request...

Alright my friends, let me tell you a quick background story on my life. I come from a family of 2 kids and my baby sister Sarai joined the Navy last year and left this past week on her first 8 month deployment. I miss her TERRIBLY, but as much as I know how much I miss her, I know she very much misses her husband of a year (who is also expected to leave on deployment early next year!) and her family and just regular old life. She has been on the verge of and extreme anxiety (as would I if I were facing having to leave the country for 8 months) so I came up with a great idea to hopefully lift her spirits. :D

I will be sending her her first care package in 3 weeks and I would LOVE LOVE LOVE it if it included some cards from my crafty friends! She loves when I make her cards and scrapbook layouts with pictures of my kids so I know how much she will appreciate this! And to make it more enticing and rewarding for you, for each person who sends me a card, I will hold a drawing for some blog candy! (Still deciding on what exactly but I'll update!)

I know that this is so close to Christmas and i'm sure you are all burned out of making Holiday cards, but I would, from the bottom of my heart, sincerely appreciate it. Any simple card would do, I just want to show her that there are many people out there who truly appreciate what she and thousands of other troops do for our country. I don't think I've ever been more proud of her in my life! :) (My little sis is on the far right, meeting my daughter for the first time in November!)

**If you are interested in sending her a card, please email me at msalmabrooks at yahoo dot com so I can give you exact details on where to send me the card**

Thanks a MILLION!!

Saturday, December 4, 2010

Vinyl-first time! :)

As some of you know, we've all been pretty ill in my house this past week, so my mother in law kindly offered to watch our baby for us so we could get some rest :) Of course, rest for me and my hubby equals out to PS3 and Cricut time and I have been dying to put some vinyl up on my walls so I thought tonight would be perfect to put my favorite bible verse up! :) Came out great if I do say so myself AND it was my first time too! My Cricut Circle sister Michelle at Scrappin With My Bug has an awesome Vinyl tutorial and she sent me some to try! I think i'm hooked! LOL


The pressure was set at low (2), speed at high and for me, I put my blade on 4 :) The words are cut out at 3" with Lyrical Letters :)

Friday, December 3, 2010

Post It Paper Blog Hop/SweetSassyDiva Design team! :)

Hey everybody! Welcome to part of the Sweetsassydiva design team blog hop! If you just happened by here and would like to start from the beginning make sure you click here!SweetSassyDiva 
If you hopped over here from Scrapbookaholic Abby then you are in the right place! I am so excited to be able to share my project with you all because I got to use the awesome Post It Craft Paper to make it! :) You all know how i'm all about saving time and this paper saves me from having to add glue to anything! I love it! Best part is that you can use it just like cardstock, so you can emboss (as I did!), rip, ink, layer (it's repositionable!) and color on it using your Imagine!

*I forgot to mention, Post It paper is sponsoring this blog hop! Make sure you leave a comment on each stop for chances to win!!*

What I did for my project is a 12x12 layout of my son at our first snow storm in our new house last year. I used the white Post It paper for the snow on my house (cut with Jolly Holidays and embossed with Swiss dots Cuttlebug folder) and I also put my paper through the expression and I used the gypsy to cut out the word SNOW in a rectangle and put the negative as my title :). The background paper is from DCWV Christmas paper stack and as you can see, I used glossy accents to embellish a snowflake I cut out from the background paper. I LOVE recycling images to use again. Makes me feel like I havent wasted any :)


Hope you guys have enjoyed my project and all those of the ladies before and after me! They are SUPER talented! :)

Your next stop is now: Kristin
Don't forget to leave her some love! :)

List of the blog hop!
SweetSassyDiva 


Rebecca


Gingerbread Scrapbook layout

Hey guys! We've all been battling a cold over here but I'm feeling better now so I made you guys another video! hehe =) It's just a super simple scrapbook layout but hey, at least the pics are getting done! :D One more thing, I'd LOVE if you left me a comment and link me to your blogs...I'm always looking for inspiration! :D

Wednesday, December 1, 2010

Tuesday, November 30, 2010

Your Story Mini!

I've been busy in the kitchen making some cookies for my kiddos to decorate tonight but I just HAD to play with my Your Story that came in the mail earlier today. SO CUTE! It's tiny, but it got the job done! Robyn at Pink Stamper and Karlee have a great how to video on this if you'd like to check it out. I tried to cuttlebug my cover then made the mistake of putting the end of the book through which kind of squished it LOL. You live and learn right?? I put in a bunch of white cardstock cut at 6x4 for "notes" and in under less than 2 minutes, my book was done! *Please excuse my messy desk and glue gunk of my mat hehe**


Monday, November 29, 2010

30 Days of Giving- Day 29!

Hey! :) Today is day 29 of this awesome daily blog hop hosted by Jill over at The Scrapoholic and it's my turn again! :D I thought for my project today, I would make a homemade 8x8 planner! (I'm also including a link to my previous project which was earlier this month!) Day 5

I don't know about you, but every New Year's my top 2 resolutions are always 1) lose weight (duh!) and 2) get organized! I've done good with my first one, losing 70lbs this past year, but I can never seem to get organized. So this upcoming year is MY year! LOL. And while I love all the cute and girly planners out there, I figured I might as well put my Cinch and Imagine to good use and make myself one but these would also make GREAT gifts to give out to anybody! :)


Tools needed for this planner:
Cinch
2 8x8 chipboard covers
Imagine
Paperbag for pockets
Jewels
patterned paper for decoration

What I did for the title was I cut out a decorative square from my Imagine at 5" and 4.5" for the brown one. I then cut out 2011 from Don Juan at 2" and I embossed the numbers in light pink. I then adhered jewels all around the edges using my iRock and added some ribbon to the wire. Yes, there is no black in my cover but I chose black ribbon to go along with my pink because that is my favorite color combo! (:D)


The inside calendar pages were used using my Imagine and Designer Calendar cartridge. I cut the pages out to 8x8 and printed my calendar grid (did not cut!) on both sides. I also printed out the months at the top so that I didn't have to do any cutting. :)


And lastly, I cut up a paper bag to 6" and used it as a "pocket" to hold notes and adhered Terrifically Tacky Tape to some post it notes so that I could use those in my planner and also, I could use that pocket to leave emergency info or contact information should I ever hire a babysitter :)


And that's it! I hope you all are having a great Holiday season! Feel free to comment below and let me know any homemade items you've made, I'm always looking for inspiration! :D

Martha Stewart Cartridge *Winner*

I totally wish I could give one of these out to every single one of you, but until I win the lottery I only had 1 to give :) so the winner chosen by random.org is....

Stacey at Stacey's Creative Corner! Stacey wrote:


Congrats Stacey! Please contact me this week so I can send this off to you :)

And thank you everyone else who helping me reach my followers goal, here's to 400! I'm thinking a cartridge giveaway every 100! :D

Sunday, November 28, 2010

Last Day..Martha Stewart Cartridge Giveaway!

Remember, the comments thread closes tonight at 11pm central, so get your comments in if you'd like a chance to win the Martha Stewart All Occasions cart!


Here is the link: Giveaway Post!

Good luck!!

Black Friday Blog Hop *Winner!*

Alright- the lucky winner chosen from random.org is.... #7!


Who said...


So Ms. Gina, please contact me so that you can get your prize! Thanx to everyone who commented and participated! You all rock! :D

Saturday, November 27, 2010

Twinkle Toes layout

I LOVE this cart! So girly, it kind of reminds me of the Paper doll carts and it's so easy to layer :) My little girl is too little to be in dance just yet, but I'm saving this page for her pics when she does start dancing! Directions after pic! :)


Directions:
12x12 pink background
11" scalloped frame cut from Better Together Imagine patterns
Ballerina cut at 6"
Twinkle Toes cut at 3 1/2"
Mats are 4x6

Friday, November 26, 2010

Black Friday small haul!

First off- THANK YOU GUYS SOOOO MUCH for helping me reach my short term goal of 300 followers! YOU GUYS ROCK! Thanks to everyone who reposted onto their own blogs, give me a few days to catch up with all my comments and I will make sure to follow each and everyone of you because you are all so talented! Next goal, 400! hehehe =) Maybe I'll make an awesome giveaway a tradition per 100 followers... ;)

**I forgot to mention this earlier but it's NOT too late to enter the giveaway! I'm leaving it open until Sunday night (11pm Central time) and choosing a winner on Monday.**

So, originally I was going to skip Black Friday because my DH works retail so he would be at work all day anyways and I don't know about you, but lugging around 3 kids under the age of 6 is NO FUN! At least, not until they are big enough to hold my bags! LOL... But luckily, my dad (who lives with us) came home early from work and watched my two boys while I took Ms. Julianne shopping and let me tell you, the girl LOVES to shop! Obviously, the apple doesn't fall too far from the tree! :) We went to Walmart where they still had a bunch of the "limited edition" carts, they were marked at $25 but I still managed to get Twinkle Toes at $20! Yay! Then we headed off to Michaels where they had all the Gypsy accesories 50% off and OF COURSE I couldn't pass up the pink Gypsy cover! I'm SOOOO excited I got this because I have been wanting it ever since I got my gypsy over a year ago but I just couldn't get myself to spend $25 on it! So $12.49, I could manage! Also- the Recollection stickers and embellishments were 50% off, so I got these two strips as well :)

*The SpongeBob cartridge came for me in the mail today which is why I'm including it! :)*


Hope you all had a great Black Friday! I'd love to hear what deals you all couldn't pass up! I'm a little jealous of those who got colored Expressions! :)

Cupcake Onesie...w/ model! :)

Thank you to all of my new followers- I am ALMOST there so be sure to be on the lookout for the giveaway any time now! :D

I didn't get to do any of the Black Friday shopping because my husband works retail and I am home with 3 kids, so to take my mind off of where I'd love to be, I decided to use what I already have and make my DD a cupcake onesie. I am obsessed with Cupcakes almost as much as the color pink and I call DD cupcake at times so when I saw this cupcake on the Better Together Imagine art cartridge I just KNEW I had to make her one! And I think she wears it well! hehehehe :)


I hope you all had a great Thanksgiving! If you haven't already posted for the Martha Stewart cart giveaway, here is the link: Giveaway Post!

Have a safe and great Black Friday!

Thursday, November 25, 2010

Black Friday Blog Hop

Welcome to the Black Friday Blog Hop! If you've come from visiting Cara atCara Miller.com you're in the right place!

If you've just happened across my blog and would like to play along with our fun hop, you can go to Crazy about Cricut and start at the beginning. Each blog has created a project centered around the shopping or using the colors black and green. Be sure to visit each blog for inspiration and fun blog candy!

I will admit it. I'm a total shopoholic. It's not a problem (yet!) but it is my favorite pastime (besides scrapbooking!) :) In honor of Black Friday I thought I would make my first altered tote bag using my Imagine and transfer paper. My daughter Julianne is OBSESSED with Minnie Mouse and she is only 10 months old! What can I say, she obviously gets that from her mama. So I thought I'd make her a tote bag to use to put her stuff in now when we go out (like a 2nd diaper bag) and when she gets older she can use it for her own Black Friday shopping! :)

First, let me tell you a quick story as to why I chose to alter a bag. When I was in 3rd grade, one of my friend's mom decided to make totes for all of her friends and boy was a surprised when I got one! I'll never forget it, it was a cream colored tote, with a ballerina bear in the front and my name in the front. It's little memories like that that can inspire your creativity today! :)

*The Minnie ears are kind of hard to see with the black on black in the pic but you should be able to make them out!*


Directions:
I cut out (and printed out) the Mickey Mouse ears from Mickey Font at 6"
The bow was cut (and printed) at 4 1/2 (or 5.) I'm sorry, I didn't write that down!
Her name was cut out using Don Juan, printed in dark pink at 2 1/2" each.
In order to make it look like Minnie's bow and not ruin the transfer paper, I cut out the bottom piece of the Mickey ears that would be under the bow so that I could just directly iron on the bow onto the fabric instead of on top of the ears.

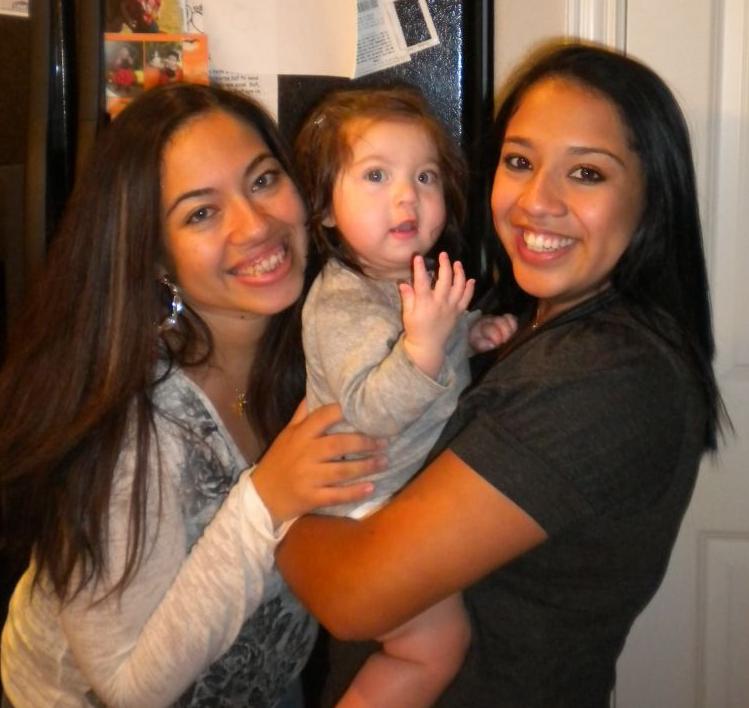
And just to top off my project, here is a pic of my little girl just because I love to show her off! Her hair now, is about almost down to her lower back. She was born with an INSANE amount of hair. But I LOVE it! :)


For my 2nd project, I made a layout to go to our shopping pictures that I'm sure we will be taking tomorrow! LOL It's a 12x12 sheet of cardstock, with 4 black mats cut at 4x4. I cut the flower and purse from Paisley at 3 1/2" and shopping was cut out from Alphalicious at 2 1/2". The argyle background was cut out into a cross shape at 3" each strip using a Daisy paper pack I bought at Hobby Lobby. Easy! I use to be really into intricate layouts but honestly, the older my kids get, the more pics I take, the less time I have and I realize how important it is just to get the pics scrapped, no matter how simple the layout! :D


**BLOG CANDY**

I have a giveaway going on a few posts down stating that when I reach 300 followers, I will be giving away a Martha Stewart All Occasions cartridge! Please feel free to become a follower and comment on THAT post.

You could find it here: Giveaway Post!

2ND giveaway specific to this blog hop- Leave a comment under this post and I am giving away 5 Cricut Imagine cuts from your choice of the following cartridges: Blast Off, Better Together, Imagine More, Nursery Tails and Best Friends. If you win, I will contact you and you can decide which 5 cuts you would like! I will close this thread on Friday night and I will use random.org to choose a winner on Saturday. :)

Hope you enjoyed my project and I hope you had a WONDERFUL Thanksgiving!

Here is your next stop: Love 4 stamps!

Happy Thanksgiving!!

I have had a crazy and sad past couple of weeks with my family crisis, but you know what? I still believe it's important to be thankful for everything else that is going right in your life! I am a FIRM believe in God so all my thankfulness is going to him :) You should never stop being thankful and you should practice it everyday! :D

My boys are spending Thanksgiving with their father, so it's just me, my husband and our beautiful little girl (who is celebrating her first Thanksgiving) hopping around my two brother in law's houses. Hey, double the food! :)

No project just yet, I'm saving that for my Blog Hop post later on this evening but I hope you all have a great and wonderful Thanksgiving with your families and friends!

Oh and one last thing....

GO COWBOYS!!!!!!!!!!!!!!!!!!!!!! :)

Wednesday, November 24, 2010

Ramblings...

I've had a CRAZY past few weeks with my extended family, but like I said before, I'm a strong believer in God and I feel that through trials, he still looks out for me and blesses me and look what I got to order today! :)


I recently purchased the Cinch but I couldn't help myself with this. Karlee and Robyn over at MyPinkStamper.com and KarleeKrafts.com enabled me with their pretty cool how to videos :) Obviously, I'm the perfect shopper they aim at because it doesn't take much to enable me! hahaha :)

I will post a review once I get it! :)

Tuesday, November 23, 2010

ChooChoo layout

My son is obsessed with Thomas the Train so for the past 2 years, he has dressed up as him for Halloween. I hadn't gotten a chance to scrap his pics from LAST year (i'm lazy like that) so last night I got to it. I was feeling reeeeally unproductive so that train (which was cut with B is for Boy) was cut on my Imagine and I just plugged the colors in. See, I didn't want to cut and arrange all kinds of papers on my mat! LOL The letters were cut using black paper and the Blast Off Imagine cart font and the sentiment in between the pictures is actually from Thomas the Train cardstock. :D

Monday, November 22, 2010

Giiiiiveaway! :-)

Seeing how i'm SO close to 300 followers, once I reach my goal I will hold a drawing for a brand new, unlinked Martha Stewart All Occasions cartridge! :-) Don't forget to tell your friends people! If you post this on your own blog, please let me know so I can enter you twice! EASY! :)

*Please leave a comment under THIS post to be entered! :)*


Birthday Fun Layout

This weekend was full of birthday parties for 2 of my nephews and 1 niece. Crazy! :) But we had such a great time so I wanted to scrap a few pictures today because I took the cutest pics of my son and his cousins. I used the background paper from my scraps and the cake and balloons were cut from Stretch Your Imagination using Post It Craft Paper! :D The letters were cut out using Blast Off Imagine cart. But of course, the kiddos are the cutest thing to the page!

Blog Award!

Thank you SO much Stacey over at Stacey's Creative Corner! She passed this award to me and i'm oh, so honored. :)


Now, this award does come with some rules and I have to pay it forward:

1. Thank and link back to the person who awarded you this
2. Share 8 things about yourself
3. Pay it forward to 8 bloggers that you have recently discovered
4. Contact those bloggers and tell them about their awards


Here are 8 things about me:

1. I have 3 beautiful kids, ages 6, 4 and 10 months.
2. I am very happily married :D
3. I was born and raised in Southern California.
4. I own an Expressions, Imagine, Gypsy, Cuttlebug, The Cinch and countless carts. :)
5. The foundation to my hobby is definitely scrapbooking.
6. I am obsessed with my Blackberry.
7. I could not live without my straightening iron and I have a love affair with my purses.
8. I cried when I found out I was finally have a little girl. I am very girly and my dream has always been to share that with my own daughter.

I would like to pass this award onto the following bloggers that I have recently discovered:
1)Two Krafty Girls
2)ABCricut
3)Crafting with Christina
4)Crazy About Cricut
5)Cricut Mini Albums
6)Jenn's Scrapbook Nook
7)Kricut Krazy
8)Scrappin with my bug Scrappin With My Bug