


I made my son his own book from brown paper lunch bags for his words of the week. :) I didn't do an instructional video, but below the video is the link to the tutorial I followed to make it. :)
Click here for tutorial from Follow the Paper Trail! :)
Sunday, August 29, 2010
Saturday, August 28, 2010
Baby girl card
I have had my eye on the New Arrival cart for awhile and it finally came from rewards yesterday! It is SO cute! Especially for a mom to a new baby, this will def become a favorite! =) So I wanted to originally make a onesie shaped card with this cart, but I fell in love with this shape instead! It's of a small tee with baby underwear. I don't know if there is a name for it but that's mine! LOL. I used Tags, Bags, Boxes and More for the "envelope" which is originally used as a tag holder. I thought it would be cute to slide the card out instead of a traditional envelope. :)


Thursday, August 26, 2010
Picture to share :)
I just wanted to share a picture of my little girl with her NATURAL Farrah Fawcett hair :) I was looking through all of my pictures on my computer and Facebook and realized that ever since I've become obsessed with 3D stuff and cards, I've fallen waaaaaay behind on my scrapbooking. So off to scrap some pictures I go. Oh, and I still plan on posting that tutorial on envelopes with MS scoreboard soon as well. :) Have a great day!!!


Wednesday, August 25, 2010
Teacher apple card w/ envelope
My boys started school this week and I wanted to make their teachers each a card as a Thank you for taking on my boys for the year (LOL) and just to make them feel like they are appreciated, because I truly do appreciate them. I designed this on my gypsy and the apple was assembled using the hide contour (have I told you how much I LOVE LOVE LOVE hide contour??!?). I also got to use one of my Peachy Keen Stamps that I won from the Throwback Thursday challenge 2 weeks ago! I plan on uploading a tutorial on how to make the envelopes using the Martha Stewart score board and also how to design this simple, yet cute card tomorrow. Stay tuned! =)


Monday, August 23, 2010
First day of school and Trick or Treat card :)
Today was the first day of school for my boys (one is going into Kindergarden, the other to pre-school) so I wanted to share a pic of them :)
and let me tell you, after I cleaned the house and fed the hubby and daughter, I found myself with time to craft! LOL. So while my DH was watching netflix and Julianne Mickey Mouse, I sat down to play with Paper Doll Dress Up. I can't believe it had been months since I last used this cart and all the cute stuff on it! Nothing like going through a cart to realize you bought ANOTHER cart for images that where on your older one! LOL. Anyways, I had fun putting this card together. Not the greatest but I love love love the little bag!! =) Hope you enjoy!


and let me tell you, after I cleaned the house and fed the hubby and daughter, I found myself with time to craft! LOL. So while my DH was watching netflix and Julianne Mickey Mouse, I sat down to play with Paper Doll Dress Up. I can't believe it had been months since I last used this cart and all the cute stuff on it! Nothing like going through a cart to realize you bought ANOTHER cart for images that where on your older one! LOL. Anyways, I had fun putting this card together. Not the greatest but I love love love the little bag!! =) Hope you enjoy!


Sunday, August 22, 2010
Baby Layout
I unfortunately don't get much time today to scrap or anything because of SO much stuff to do before the boys go back to school tomorrow, but I did get a moment to quickly throw this page together. My little girl has started trying to crawl and after all the cards and 3D boxes i've put together, I've gotten a little behind on my scrapbooking. Michelle from Scrappin with my bug (Who is also my Circle sister!!) sent me some awesome girly sayings for layouts and I used one of them for my page! =) The baby is cut from Everyday Paperdolls at 6" and of course, used my iRock for bling!


Saturday, August 21, 2010
My first blog award!

So excited! I just got my first blog award! =) Woohoo! Thank you Kim from Capturing and Scrapbooking Life's art. Check out her blog! Super cute! Ok...now on to the requirements.
3 things I like about myself:
1.) I think there is good in everybody. Even those who have done me wrong.
2.) My hair. hehe ;)
3.) No matter what, I believe in God and my faith in him never waivers. :)
My favorite picture:

My little girl is getting so big and trying to crawl! This is my fav pic for the moment :)
I now get to pass this on to 5 other blogs and i'm so excited because I truly admire these girls and their talents :)
1.)Amber atStaying Crafty
2.)Brandi at Scubascrapper Brandi
3.)Michelle at Scrappin with my bug AND my Cricut Circle sista!
4.)Brandy at Pen Brandy
5.)Crazy about Cricut at at Crazy about Cricut!
The rules in accepting this award are:
1. you must thank the person who passed it on to you:
2. copy award to your blog.
3. list three (3) things you love about yourself,
4. post a picture that you love on your blog,
5. pass award on to five (5) others
Friday, August 20, 2010
Girl onesie card :)
I changed my mind on the explosion box to give to my SIL tomorrow, so I had to come up with a new card. I was already freaking out because I still haven't cleaned my kitchen from all the cupcakes I made, I still have homework to do, laundry to fold and here I am trying to think of a card to come up with. I recently purchased New Arrival through the Rewards site mainly for the onesie but since I still haven't received it, I remembered that B is for Boy Lite cart has one! So this girly card was made using a boy cart. :)


Shout Out Video!
Today has been an AWESOME Friday!! I received my stamp set that I won from Emma for her Thursday Throwback challenge last week (yay!!) AND I received a package from my Non-Secret Cricut Circle Sister Michelle from Scrappin with my Bug and it was soooooo great!! I show you my goodies in my video! Hope you enjoy!
Thursday, August 19, 2010
Tags Bags Boxes and More....ITS HERE!
We all know how badly I have wanted this cart and today, I finally got it! Woohoo for Scrapbookpal.com for their super fast shipping!!!!!!! =) Anyways, I had to drop off my boys with their father and this afternoon I got to play around with it for a little bit. I took the inspiration from the "binder" project but made it my own. Mostly by adding a flower with yet ANOTHER jewel with my iRock. I can tell that this cart will definitely feed my boxes addiction now! ;)


Wednesday, August 18, 2010
Rock Princess Ipod Card
I wanted to play with my Rock Princess cartridge today and saw that they have THE CUTEST ipod cut! I had totally forgotten how much I wanted that image and that was a big reason I purchased it in the first place! I am also obsessing over my iRock tool, blinging everything I can and put stickles as the "music" bars. Hope you enjoy and directions following pics :)


Directions:
Weld two Ipods on gypsy at 6"
Cut layers at 6"
bling it up! ;)


Directions:
Weld two Ipods on gypsy at 6"
Cut layers at 6"
bling it up! ;)
Tuesday, August 17, 2010
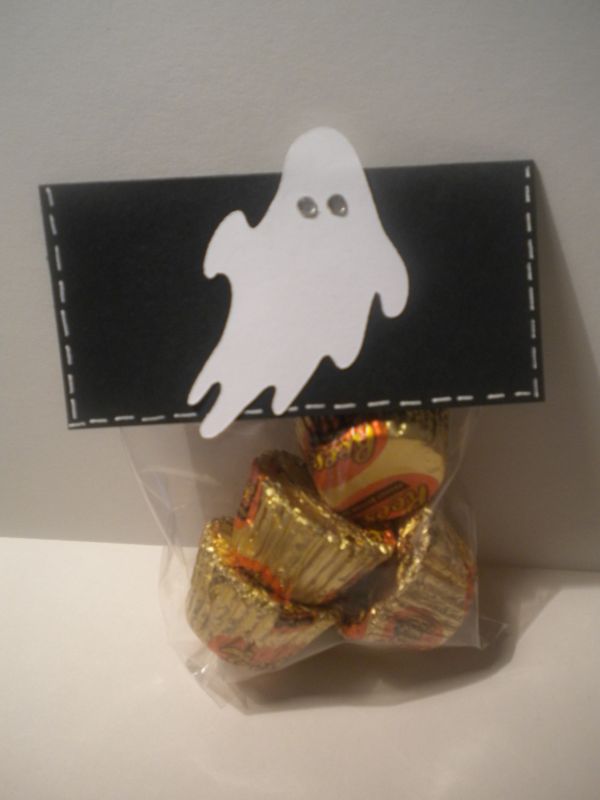
Halloween Mini Treat Bags w/ iRock
I have been wanting to make some little treat bags for awhile and with my boys going back to school next week and Halloween coming up, I thought, what the heck. Let me throw one together. LOL. Directions after pics!


Supplies:
Happy Hauntings Cartridge
iRock (or any jewels)
gel pen
candy
treat bags (I purchased mine from Michaels)
Directions:
-Cut Ghost and Witch's shoe at 2"
-score a piece of cardstock (3"x3") in half and fold
-Place ghost and witch's shoe on cardstock, adhere.
-Use jewels (I used iRock) for ghost's eyes and shoe's buttons.
-Place candy in bag
-Staple or adhere folded piece of cardstock over the opening of treat bag =)
Monday, August 16, 2010
Baby Shower Cupcake Favors
*Video at the bottom!*
I am providing favors for my SIL's baby shower on Saturday and came up with this idea. It is a cupcake in a cupcake box from Sweet Treats, wrapped in a small gift bag with a stamped sentiment on the front. Cute right??? =) I'll give you directions after the pics but there is a video coming! LOL. The cool thing about this is that you can totally take it and make it your own for ANY occasion. I plan on making some favors for my son's upcoming birthday, change the cardstock, theme, anything! =)


Supplies:
Clear plastic gift bags (purchased mine at Michaels) to cover box
Sweet Treats Cartridge
Mini Mongorams Cartridge
Stamped Sentiment of your choice. I used My Pink Stamper's Special Occasions set.
Heavy cardstock of your choice for cupcake box
Ribbon
Cupcakes (duh!) LOL
Directions:
Cut cupcake box at 6 1/2" (Sweet Treats)
Cut scalloped circle at 2 1/4" using Shadow Feature (Mini Monograms)
Cut circle at 2 1/2" using Mini Monograms.
Adhere scalloped circle and circle.
Stamp sentiment on circle.
Apply stamped circle to flat box on side you want in the front
Score box.
Put half of the box together,leaving you a flat side to slide your cupcake through.
Put remainder of box together.
Place cupcake favor in plastic gift bag.
Wrap ribbon around the plastic and tie together :)
Sunday, August 15, 2010
Exciting Weekend! + Weight loss!
I didn't get to work on a project today BUT I have had an awesome weekend that is very much Cricut related! :) First off, I won my first Throwback Thursday Challenge and i'm so super excited!! I won a set of Peachy Keen Stamps that I absolutely love! I will post pics when I receive them! :)) Also- DH finally gave me his blessing to order Tags Bags Boxes and More and I couldn't be more thrilled! I have been wanting this cart FOREVER and wanted it even more AFTER they took it off Rewards. I was saving up my points for the Circle Rewards and after the fiasco that happened this weekend with that, I'm a little bummed that I didn't just get TBBM with them. Oh well. Something about a cart retiring and not being able to find it through most retailers makes you want it even more. :)
Oh and I need to update my weight loss tracker because I am now down to 151 pounds! Making my total weight loss 64! WOOHOO!
Hope you all had a great weekend!
Oh and I need to update my weight loss tracker because I am now down to 151 pounds! Making my total weight loss 64! WOOHOO!
Hope you all had a great weekend!
Saturday, August 14, 2010
Snail Mail! *Michelle-DO NOT LOOK!*
So my non-secret Circle Sister is Michelle from Scrappin with my bug and I couldn't be more excited! I got her package ready to be sent so of course, I had to make her a card to go along with it and since it's being sent as regular mail, I thought the phrase "Snail Mail" would be perfect. So if this is Michelle, don't look if you wanna be surprised! LOL Directions after pics :)


Snail was cut at 3 1/4" using Paisley.
Welded two Snail shadows together for card base.
Cut layers at 3 1/4"
Used The Paper Company's alphabet stamps to spell out "Snail Mail".


Snail was cut at 3 1/4" using Paisley.
Welded two Snail shadows together for card base.
Cut layers at 3 1/4"
Used The Paper Company's alphabet stamps to spell out "Snail Mail".
Thursday, August 12, 2010
Explosion Box :)
*Inspired by Paper Past Time Denise's beautiful explosion box! Click here for her tutorial! She does a GREAT job explaining it! :)
This is my first ever explosion box! Ok, I lied. I have been trying to conquer this for the past 3 days. But I could not get the dang measurements right so hubby gave me the ok to go to Michaels this morning and buy a MS scoring board. SUCH A DIFFERENCE! :) The measurements came out perfect this time and the gift card was cut using Plantin School book envelope cut at 3 1/2". Anyways, this explosion box has a gift card holder inside and it is for my SIL's baby shower next week. I can't wait for her to see it! :)


This is my first ever explosion box! Ok, I lied. I have been trying to conquer this for the past 3 days. But I could not get the dang measurements right so hubby gave me the ok to go to Michaels this morning and buy a MS scoring board. SUCH A DIFFERENCE! :) The measurements came out perfect this time and the gift card was cut using Plantin School book envelope cut at 3 1/2". Anyways, this explosion box has a gift card holder inside and it is for my SIL's baby shower next week. I can't wait for her to see it! :)


Wednesday, August 11, 2010
Kiss the Cook layout
I figured I might as well get the "grilling" pics of my DH out of the way (i'm not really great at "masculine" layouts) He hates his pics so I wont post the actual pic but the layout is simple and cute. Once again, let the paper do most of the talking, cut out Kiss the Cook at 2" using Mickey Font and matted the picture frame. :)


Throwback Thursday Back to School challenge :)
I think I got started on this challenge as soon as she posted it up! LOL Unfortunately my son got a hold of my page before I got to take pics so the numbers on the bottom are a bit bent but all is good. :) This week's challenge was Back to School and I remember I had pics of my sons going to Preschool last year that I hadn't made into a layout yet. We had to use Paisley but I could not for the life of me figure out how to incorporate Paisley so I used Alphalicious for my wording, Locker Talk for the bus and Plantin Schoolbook for my apple. Hope you enjoy :)


Monday, August 9, 2010
Crown Onesie
I'm always one for personal style so tonight I made my daughter a onesie from the Rock Princess cartridge. I chose a crown because I love the image, but it also gave me a chance to play with my iRock tool and bling it up a bit. :) The onesie is a 6-9 month and the image is cut at 5".


Easel card tutorial
I got a few requests asking for a tutorial on how to make an easel card and since i'm a visual person, I decided to make a quick video. It's one of my first so i'm still learning and my voice is not naturally that high but I hope it helps you! :)
Rock Princess Card
My Creative Time gets TOTAL credit for this card. I scraplifted this from her post on the MB and I completely fell in love with it and wanted to give it a try. So Emma- THANK YOU! :)
Here is MY version of the Rock Princess card. She was welded at 6" using the shadow function then layers cut seperately. Hope you enjoy :)


Here is MY version of the Rock Princess card. She was welded at 6" using the shadow function then layers cut seperately. Hope you enjoy :)


Saturday, August 7, 2010
Bewitching Easel card
I am trying to branch out and do things that I have never done before and this, my friends, is my first easel card! Very simple to do and of course, with my obsession with my Happy Hauntings cartridge, I just had to make it Halloween theme! I used it to cut out the frame, witch and phrase.


Friday, August 6, 2010
Rock Princess Card
I've had a very trying week and today finally just played with my Cricut to get my mind off of things. I was fortunate enough to get Rock Princess last night (Thanks honey!) and I came up with this Girls Rock card for my brother in law. LOL. It's an inside joke. =)

I wanted to get a close up of the stickled face. I love it and I also got to use my new iRock tool! I LOVE it!! =)

I wanted to get a close up of the stickled face. I love it and I also got to use my new iRock tool! I LOVE it!! =)

Wednesday, August 4, 2010
Spooky Layout
I have been itching to play with my new Midnight Spell paper pack to make a layout all day. So after kids were showered, bathed and fed, I got to playing and I LOVE LOVE LOVE this paper! The spooky has white glitter mist on it and its just a fun layout.


Directions:
Midnight Spell paper background
2 4x6 photo mats
Spooky cut out at 3" Happy Hauntings phrase


Directions:
Midnight Spell paper background
2 4x6 photo mats
Spooky cut out at 3" Happy Hauntings phrase
Subscribe to:
Posts (Atom)

