About Me

My photo
I'm Alma, I'm the mother to 2 beautiful boys and a gorgeous little girl. I love God, scrapbooking, shoes, sunglasses, purses and shopping.

My Blog List

Weight Loss 2012

  • 8/1/12- 177.3
  • 8/8/12- 175.0

My Pinterest!

Follow Me on Pinterest

Proud Circle Member!

Grab my button!

Blog Hop
Powered by Blogger.

Sunday, November 18, 2012

Itty Bitty Bag Blog Hop!

Hi everyone! WOW! It has been quite a while since i've actually used any of die-cutting machines but my friend Abby  asked me to be a part of her Itty Bitty Bag Blog Hop and I wanted to join just to CUT something :) You should have come from Jenny over at http://crazyaboutcricut.blogspot.com/ but if you started from me, go ahead and head to the beginning over at Abby's blog :)www.scrapbookaholicbyabby.com. I GUARANTEE you will find much more phenomenal projects done with these cute little bags!

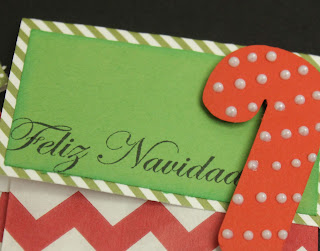
For my project, I used Abby's Dilo en Espanol stamp set "Que Siga la Fiesta" and used "Feliz Navidad" for some quick Christmas treats to send over to my grandparents. My grandparents don't speak English so this stamp set is PERFECT for them and also, the small bags make it easy to be able to hand out or ship :)


If you notice, the candy canes have "Liquid Pearls" as their stripes, my Cameo wasn't really cooperating very well when I cut these candy canes so I had to improvise ;)

All of the stuff, the stamp set and the bitty bags can be found at Abby's Store- http://abby.bigcartel.com/category/ittybags

Also- there is a GIVEAWAY! In order to win your own pack of bitty bags, you must comment on each of the posts and Abby will choose 10 winners! I guarantee you will LOVE these! :) 

Next up is Patty at mynameisscrappy.blogspot.com

Thursday, November 8, 2012

Update

WOW! It's been a while since I've lasted updated my blog and although I am soooo happy I haven't lost any followers, i'm sad that I haven't kept this up but truth is I have been SOOOOO busy with my new custom hair bow business that I just don't have much time! I am very excited though because I plan on coming back to scrapbooking since Abby has invited me to be a part of her blog hop next week! Woohooo...get to play with my Cricut and Cameo again! :)

In the meantime, I wanted to invite any of you to my Facebook page to like it and to check out some of my hair bows! Some of my customers get super creative in what they want but I am loving what I do! Never a dull moment since I get to work with so many different characters, etc :)

And, I hold a giveaway each time I reach 100 likes so make sure you like my page and share with your friends! :) www.facebook.com/juliesbowtique10


Sunday, September 23, 2012

Boutique Bows and Facebook Giveaway!

I have been SUPER busy this past week since 'officially' opening my homemade boutique bow business :) I am loving what I do but I gotta say, didn't realize how busy I'd be! I have quite a few orders to get done today but I wanted to quickly share some bows i've created :) I'm also having a giveaway on my Facebook page, so if you haven't, head over there and like my page and fill out the entry form for a chance to win any one bow of your choice! :) I will be holding a giveaway everytime I reach 100 likes so dont forget to share! :) Here is the link for the giveaway and my page:


This is my custom Steelers bow for my husband's cousin :) It's roughly 5" with 3 layers and a bottle cap...love it! (Even though I am a Chargers fan!) 

This is a simple Hello Kitty bottle cap bow. Isn't she sweet? :)

Have a great weekend! :)


Tuesday, September 18, 2012

Exciting news :)

Wow! I'm sorry I haven't posted in over a month, where did the time go? I see I got some new followers, thank you :)) I have been busy with some other things that I haven't had much time to really play on either my Cricut or Cameo but i'm hoping soon to get back to regularly posting :)

On that note, I wanted to let you all know that I have finally started my first Facebook page for my small, homemade hair bows business! :) I'm so excited, I love making them for my daughter so they are inspired by her and all things girly and I just wanted to give you all the link so you can feel free to follow along on FB! I plan on doing giveaways and much more and if you have a small home crafty business, I'd be happy to spread the word around as well! :))

https://www.facebook.com/JuliesBowtique10


Tuesday, August 14, 2012

Heels Favor Box-Silhouette

Typically, each day I log into the Silhouette online store to see if they have released any new images for me to use my membership money on :) Today I logged on and saw THE CUTEST heels 3D box that I knew I just had to have :)


Cute right? This would be perfect for like a centerpiece for a Bachelorette or really, any girly girl's party! 

Once I cut everything out it took me awhile to figure out how to glue and place things and if you can see reallllly closely, you can see some of the tabs :) I figured out AFTER I glued how to hide those ;) I will post a video by Friday how to make this and in the mean time, I will try to make a cut file for CCR (Cricut Craft Room) for all my Cricut friends :)


Sunday, August 12, 2012

Diaper Baby Card- Silhouette

Happy Sunday! :) Today was a great day! Got up early and made it to church and then spent a lazy Sunday watching my kids play while my oldest son was at the circus with my mom :)

Then I realized that my sister in law is scheduled to be induced tomorrow morning at 5am and I still hadn't made her a card! So I decided that once my kiddos went to bed, I would make something. Well, you all know me, know i'm not much of a card maker so I went on pinterest and started looking for ideas. I didn't find anything I felt compelled to scraplift so I googled and came across the cutest diaper card template! So I saved it and then did the whole trace and detach thing (just like a clip art!) and made my own template...the cool thing is that I learned how to perforate my own lines so that I could now score it! YAY! I'll post that video sometime later this week :)

Also- if you haven't noticed, I decided to start labeling my post titles with either Silhouette or Cricut so you will know what machine i'll be using. I know a lot of you use one or the other (I'm still very happy to report I use both!) so this should make things easier :)

Alright- this is my interpretation. Cute right? Instead of making a whole card for the inside, I used a Top Note for the place of wording. Simple and not so bulky!

*Quick note* I am NOT a stamper. For some reason, I never have been able to really get too into it. I love the sentiment stamps but that is as far as I go but for some reason my stamps from Michaels would not stamp well! I think it's cause they are cheaply made or something. So ignore the stamps ;)


This is the top note :) I put the big ol' sentiment on the lower right so that it would give my husband and I plenty of room to sign the card.

If you are interested in the cut file for Silhouette feel free to email me and I will send it to you! :)

Oh and one other thing! 

I have had SCAL 2 FOREVER and I might have used it about a total of 3 times. I am a LAZY SVG'er. I love playing with them "virtually" and admiring them but when it comes to actually cutting it I get SO lazy having to think of all the tiny pieces, blah blah blah. So my son requested a Spiderman die cut (he loves to play with them alongside his legos) and decided to try my SCAL2 (since I don't have the Silhouette Designer Edition. I'll get that when we come back from Disneyland ;) Anyways- I finally created my first SVG! Awesome!


Far from perfect, if you can see, I actually had to cut the black edge because I realized that while the mask had cut, a line around the face hadn't sooooo...that sucked but I think it came out good for even just a scrapbook layout :)

Have a great weekend!: )


Tuesday, August 7, 2012

Hello Kitty Shape card- Cricut

I know my blog looks really different.. but it's currently in the process of being re-designed (by me! And since I have NO knowledge i'm kinda teaching myself!) so I wanted something a little more simple yet more me. My favorite color combination is pink and black so there you go :)

Today I decided to break out my Hello Kitty Greetings cart and make something. I'm not really a card maker, in fact, cards scare me. I LOVE to make little 3x3 or 4x4 cards cause they are so cute and small but normal size cards just intimidate me. I guess because I see so many BEAUTIFUL cards out there and to be honest, my love is still scrapbooking so I never really try to "improve" my card making skills.

So today, with my daughter right by my side, I decided to make a shape card. Now, this is a little different than your typical shaped card, this one is welded like a word book but only to make a card so the inside is a little smaller. Eh, just something different. I'll probably send this card to my Hello Kitty loving  friend who is having a baby girl in October :)


 I used stickles to "bling" her up a bit and I also "faux" stitched around her to make her stand out a little.

Hello Kitty is 6.5" tall and she was welded to a 9" rectangle (roughly, I'm sorry I forgot to write measurements!) but given enough room to where I could score the card at 4.5". This should have been an A6 card but came out slighly bigger :) I was really contemplating selling my HK Greetings cart (especially with the insane prices that they are going for on Ebay!) but I think I might keep her a while longer :) I can clip art to my heart's content on my Silhouette but there is nothing like paper piecing! 

On that note.... my son Jacob was super bored today (they go back to school in 3 weeks) so he decided he wanted to cut out different lego pictures and make a cute little art project. I captured a picture of him at my scrap table which is a huge deal since he doesn't believe crafting is for boys! :)


Monday, August 6, 2012

Strawberry Shortcake Shape Album

First off, thank you to everyone for your amazingly sweet comments on my Disney shaped album from yesterday! My FB notifications have gone off with them and so many people have commented that you enjoyed my video so i'm SO happy that you liked it! Definitely was the motivator to keep my blog going! :)

I've been on such a "mini album" high (LOL) that tonight I decided to make a slighter bigger version of the shape album but this time I would use ONE clip art image of Strawberry Shortcake and the rest of the pages would be made of Julie's name. How awesome is this idea? You can now make your child (or yourself or whoever!) a personalized album with their absolutely favorite thing! (Julie is REEEEALLY into Disney Princesses right now but she does have a spot for Strawberry and to tell the truth, i'm kinda princessed out at the moment!) hehe ;)

I did the exact steps to weld my shapes together but for the text, all you have to do is choose your favorite font from ANY you have downloaded on your computer :) For this album, I used a font called "Oh! Photo Shoot!" which you can find HERE!


Ok, so I totally promise I have not neglected my Cricut (I have had a few emails asking if I would still do Cricut projects!) so I am actually going to bed tonight and designing something on my Gypsy. As much as CCR is cool lately it has been messing up on me so it's back to my Gypsy :-) Not that I mind, since I was a Circle member in July I was able to download all the digital downloads..hmmmm...maybe that is what i'll do next! =)

Have a great week :))))


Sunday, August 5, 2012

Shaped Mini Album- Silhouette

I seem to do my best crafting when i'm EXHAUSTED (or when i've taken some zzzQuil) but for some reason when i'm about to go to sleep, that seems to be when my brain starts coming up with ideas :)

So last night as i'm dozing up, I start to wonder if there was a way I could make a Shaped Mini album (My daughter has me ALL over the Minnie Mouse that I almost wrote it "Minnie Album!" hehehe ;) with clip art and therefore eliminating all those tiny little layers and cuts. So I got onto my Silhouette software and started designing what would now become this: 


Isn't this ADORABLE?? My very first shape album too! 
This album measures 4.75x9 so it's small but oh soooo cute :)

I knew that with Silhouette we could make a shadow out of ANYTHING and so I figured, well, if I could make a shadow with my clip art, then I should be able to weld to make a book and I was RIGHT! Once you get the hang of it, this book is super easy to make and the best part? Is that you can do this with ANY clip art image out there! So my next book will be a Strawberry Shortcake book for princess :)

I posted this up on my FB page and I got soooo many requests for a tutorial so I made a video today on how to do this (in the video I use Hello Kitty clip art). The video is a little long (15 minutes) but I tried to cover everything needed :) I was kind of trying to hurry as I was running late for date night so I hope it's easy to understand, if you have any questions feel free to message me! :)


And yes- I have gotten requests for a Cricut version as well so tomorrow, I will be working with CCR. Now with CCR (or Cricut in general) you can't use Clip art images but this will work with any images with a shadow base. I'll figure something out! :)

Hope you all had a GREAT weekend and if you do make a book I'd LOVE to be able to see! :)) 

Thursday, August 2, 2012

Glitter Iphone Case

Hi everyone :) If there is one thing that I absolutely LOVE (besides God, my family and my die cut machines) it's DEFINITELY my iPhone! (And I KNOW that a lot of you will probably agree!). I am always on the quest for the perfect iphone case and so imagine how excited I was the other day when I came across a pin on Pinterest on how to make a glitter iphone case! The cool thing about this technique is that you probably already have the supplies in your craft closet :)

Supplies:
-Iphone Case
-Glitter
-Modge Podge
-Sealer

It's SUPER easy to make, all you have to do is take modge podge and put one coat over your case and dump glitter on top. Let it dry for about 15-30 minutes then you will layer another coat of modge podge and add more glitter. Do this until you are happy with your results. 

Once it's ready and dry all I did was add "Modge Podge spray sealer" over it and let it dry for about an hour and I was done! The previous technique called for nail polish and i'll be honest, it did not work very well for me so I spent a whole $4 on sealer and sprayed it instead. Still a LOT cheaper than the $25 case at Walmart that looks just like this and the best part is that you can use ANY color glitter you want! I used Martha Stewart's glitter which is fine and just held up great :) And with the sealer, you don't have to worry about the glitter coming off :)


Saturday, July 28, 2012

Minnie Mouse T-shirt

OMG, 2 posts in one week? I'm on a roll! LOL

As some of you know, we are taking our kids to Disneyland in October and we are SO excited because this will be Julie's first trip out there! She is such a HUGE Mickey and Minnie fan (As well as princesses) so I know it will be so worth it!

I love Pinterest and the other day I saw someone had pinned a post about a Minnie t-shirt made from applique that was zebra print and of course I knew I had to scraplift it! The awesome thing about accumulating and HOARDING so much crafting material is that you sometimes have all the supplies you need for a project therefore, in my mind, making it almost free! (hahaha) :) To make this shirt, all I had to do was buy the shirt from Walmart ($3.88) since I had the heat transfer vinyl already I was good to go!

To me, heat transfer vinyl is soooo much easier to use that regular vinyl because it already comes with backing material, eliminating the transfer tape step :) I used the zebra iron on from Hobby Lobby (I found it in the t-shirt aisle) and it's iron on material that you can cut on your die cut machine! SO ADORABLE! I think they have zebra, pink polka dot, etc. The glitter is the heat vinyl transfer and it stuck like a charm :)

Now, the only thing I have left to do is stitch around the edges so that I can make sure it is secure and she is good to wear it for her first day at Disneyland :) If anyone wants or needs step by step instructions, let me know and I will be happy to make a video showing you how to make your own shirt! :)


Close up! Don't you just love zebra print? Augh, I can never get enough! :)

Have a great weekend! :)

Friday, July 27, 2012

Disney Princess Paper Doll

Hiiiii! :)) As most of you know, Julie is a HUGE HUGE HUGE Disney Princess fan (and while we are at it, I will admit to it too! ;) and she absolutely ADORES the Disney Princess website. (If you haven't checked it out, you really should! It is SO cute!)

So she loves paper dolls and the website has a paper doll template that you can print out and then cut out and glue together to make your own. I thought, hmmm, 'I wonder if I can do it on my Cameo?' and guess what? I did! Therefore saving me having to cut anything out with scissors! (I'm SO very lazy now!) If any of you own the Cameo and would like the template all ready to go, email me at msalmabrooks@yahoo.com and I will send it to you!

Here are a few pics of the doll and of course, my own real life princess :)

This is the pieces after they have been printed and cut by the Cameo


Adorable right? We had to add some "bling" because some words printed out on her dress and we wanted to cover it up!
 And here is my real life princess, Julie, admiring her doll. It's amazing what makes her happy! 


Sunday, July 22, 2012

Julie's Ballet video

You know, when I first started this blog a long time ago, I had done it to keep my family updated on my children and life in general. Now with most being on Facebook, my blog has usually been about my crafty side but I MISS blogging constantly and I miss talking about my kids! hahaha :) That is why it's titled my Pink LIFE :) So for today's post I wanted to share the cutest little video I have!

Julie is one month into her beginning "ballet" classes and she LOVES it! This class is for 2 years old and up so you can definitely tell who the older more "Experienced" kids are but she's learning and she is just having the time of her life! Can you possibly imagine anything CUTER than toddlers as ballerinas? Yeah, me either.

 I hope you enjoy this quick video! :) This upcoming week I will have a Silhouette tutorial on how to print a title and then cut around it. Easy!

Have a happy and blessed week! :)


Monday, June 25, 2012

3D Cricut Batman- Video

Hey! So I made a 5 minute video last night showing you my new 3D Batman that I made and also share some tips on how to successfully cut this out :) I GOOGLED everything I could and could not for the life of me find a tutorial on how to make this so I kind of hard to learn as I went. In case you don't want to watch the video I'll share my tips on how to cut this out, but I will make another video showing you step by step this week :)

**TIPS**
-Cut as BIG as you possibly can! I used the "Fit to Page" feature and it came out to 9 1/4". You definitely don't want to deal with the tiny pieces if it's any smaller. (Unless you like to then more power to you!)

-Cut in order. And by order I mean, the very first base image is your HEAD box. Then cut the rest of the images according to the booklet.

-Glue all of your details onto your bases BEFORE you put it together. It will save you a lot of headache. :)

Saturday, June 23, 2012

Batman birthday invitations

My son Jacob is turning 8 years old and now that he is getting older, I can't get away with not having birthday parties for him anymore. If you know me personally, you know how much I typically despise throwing parties, mainly choosing to use the money that would have been spent on the party on a better gift for my kids. Well now Jacob has asked for a Batman birthday party so that is what he is getting :) Good for me because I was able to dust off my Batman cartridge (that I was lucky enough to get for $9 on ebay before all the sales went away!) and got to work designing. 

The cool thing about these invitations is that it really was not that hard to do! I actually used BOTH my Cricut and my Silhouette Cameo to make these. The outside is made from the Batman cartridge and the inside is designed on the Silhouette software. You could also use Word to do it since it's just a simple square but for me, it's easier to do it on Silhouette only because I can get it to print and cut exactly where I want :)

I downloaded the Batman Forever font from dafont.com :) Free! 

Have a happy weekend! 


Wednesday, June 20, 2012

Baby Shower!

Hey! I see I have accumulated quite a few new followers- THANK YOU! :) I love reading the comments you guys leave me and all that fun stuff! I promise I will be posting more regularly now that summer is here! For today I'm going to show you a couple of pictures of the baby shower I hosted for my sister in law who is due in August. Can you tell she is having a boy?=)


I did all the invitations (managed to do them on my Imagine before it got sold!) I made the banners, make the favors, cupcakes, cake pops, etc. I'm SO blessed my mother in law provided the food because honestly, I was so busy I would have completely forgotten!


This is the decorated dessert table...My first ever attempt at a diaper cake is right behind and those tissue balls were made out of what else, tissues :)


I'm particularly proud of my cupcakes because they are the very first batch I have ever decorated with an actual piping bag and tip! I am SO addicted! I even made the buttercream frosting and colored it myself :) Just tooting my own horn here! ;)


I can't believe this is the only shot I got of the banner but the banner was made on my silhouette using a font called "Pleasingly Plump" from dafont.com. ADORABLE right?? She asked to keep it after the shower and of course, I said yes :)


Close up of the VERY simple diaper cake with a bow from CCR- 3D bows. The signs and favor tags where all made on the Cameo :)

That's it! I'm happy to report that she LOVED it and that she now thinks I should plan parties for a living. LOL. No thanks! :) But I will do it for family and friends anytime! haha :)


Friday, June 15, 2012

Scraps to Treasure blog hop!

Hey guys :) Thanks for joining us on the Scraps to Treasure blog hop! IThe purpose of this blog hop is to showcase different ideas on how to use your scraps that you have laying around for a whole new project :) You are in the right place if you came from  http://theglamoroussideofscrapping.blogspot.com . If not, to start from the beginning make sure that you go to http://scrapandchat.blogspot.com (Sorry! My links are not working for some reason).

We all know I'm not really a "Card" maker, I am a scrapbooker so whenever I have any extra scrap paper, I save it to reuse on a layout! I did this with the extra white I had from another project and ran it through my Cricut Imagine to make my own "Cricut Circle" paper. I also reused scraps for my title :) And of crouse, I had to show case my beautiful little scrapbooker in training :) She is Julianne and she LOVES her Cricut!


Now...Blog Candy! 

There are two sponsors for this hop, Shannon Keith will be donating an item from her Etsy shop and Ginger Snap Scraps will be donating a $10 gift card so make sure you leave comments :)

Now MY blog candy! I am giving away the Cricut Circle Cartridge "Out of Character" when I reach 1000 followers so of course, leave me a comment and follow for your chance :)

Now you are off to Erica over at http://mycricutcraftroom.blogspot.com

:)


Sunday, May 27, 2012

Print and cut-Silhouette Cameo

Hey guys! Hope you guys are having a great 3 day weekend! Here is the first Silhouette video I promised, it's quick just showing you how to quickly print and cut using your Cameo. Enjoy and don't forget to comment starting today for a chance to win the Cricut Circle "Out of Character" cartridge!

Friday, May 25, 2012

Silhouette Gift Card winner + ANOTHER giveaway!

Hey guys! Thank you SO much for waiting patiently for my winner of the gift card to be announced. I had to get a root canal this past week (NO FUN!) but man, oh man, I had forgotten how GREAT I can feel with NO more pain! Anyways...the winner of the Silhouette Gift card (chosen by Random.org) is Teresa from SkyBluePink creations! Thank you all SO much for your comments :) Means a lot to me! Now I did say I am going to be posting some Silhouette videos so continue to be on the look out for those :))

Now onto ANOTHER giveaway! Yup, I just love them, don't you? Well, as you all know, I am a member of the Cricut Circle and decided that instead of selling my "Out of Character" cartridge, I am going to give it away here on my blog once I reach 1,000 followers! I know i'm still 242 followers away but this is my goal! Yay! So starting next Monday I am going to be having a Birthday celebration for my 26th birthday on June 5! Each day I will post a new project and you can comment on any post for a chance to win this cart! If you share it on Facebook and twitter, I will also add more entries for you :) and once I reach 1,000 followers I will have a drawing for it! Simple!


It is not linked but it is now out of the box so I could have a little peek at the book :) It will also come with the reward points! 

Have a WONDERFUL and safe Memorial Day weekend!! :-))

Sunday, May 20, 2012

Barbie Silhouette Hair Bow

Hey guys! I'm sorry I have been falling behind a bit BUT I will have a winner for the Silhouette Gift card announced very soon! Thank you for all the wonderful comments on my card and crafts in general, I truly appreciate them! :) 


So I don't know about you but I absolutely LOVE girl's hair bows and accessories for Julianne, so after talking to my mother (who encouraged me to start making them!) I started working on some designs last night and this is one of the first I came up with. It is  zebra print and pink with a barbie Silhouette bottle cap in the middle, so perfect for that girly girl (and lets face it, Julianne is definitely that!) ADORABLE right?? So I actually made this barbie silhouette on my Cameo! I am working on a video RIGHT NOW to show you how quick and easy it is but thought I'd start off first with my blog post :)


I then adhered it to a headband and all done! Cute right? So I'm going to be starting my own small "etsy" store in the near future and will be adding these on and when I do go "official" I'll let you know!

Have a GREAT Sunday!


Saturday, May 12, 2012

Fibromyalgia Blog Hop

Hey guys! Thanks for joining us today on our Fibromyalgia Blog Hop! I was asked by a sweet friend Alice to participate and I am excited to bring at least some kind of awareness so if you'd like to start from the beginning, please visit her blog at http://giagarcianewlifenewbeginning.blogspot.com/.  **I tried SO hard to link that but Blogger is not letting me** I'll admit, I have heard of some of my friends talk about Fibromyalgia but never truly looked it up until recently. Just want to send my thoughts to all of you affected by this, I know how hard it can be but you guys are so strong for continuing your day to day lives :)

For my project I made a card using Art Philosophy for the shapes on my card and Pink Journey for my ribbon. The card base is 8 1/2 x 6 (it's pretty big!) and the cuts are cut at 4" for the ribbon and 5" for the shapes and 2" for the base of the "stamped" image. (It's really just Microsoft wording!). I then glued a bow to the middle, embossed the shape with my Tiny Dots folder and and faux stitched the edges. Fairly simple card but hopefully it brightens the day of whoever receives it ;)

For my blog candy I am giving away a Silhouette Cameo gift card! This is different than the other giveaway I have going on on a seperate post but all you have to do is just follow and comment on each of our blogs :)

Aren't those gems cute? I got them at Hobby Lobby! There is like a million in each pack haha :)


For the saying I cut out my "cut outs", then I used a text box in word, sized it accordingly and wrote out my texts. I then printed it and then used removable adhesive and placed my cut over the saying and ran it through my printer again. *Just realized my gems on the bottoms are a little  crooked, oh well* ;)

That's it! I hope you enjoyed my little card (remember, I am not a card maker! hehe)
You're next stop is Kimberly over at http://scrappingrookie.blogspot.com/ so you can see her adorable project :))

Wednesday, May 9, 2012

Baby Shower invites- Cricut Imagine

Hey guys! So remember how I might have mentioned before that I was going to sell my Cricut Imagine? I got caught up in the Cameo frenzy and the whole print and cut feature with them that I actually put my poor Imagine on Craigslist last month for a whopping 3 days. Well, after I kept getting offers and my heart would break with each thought of my "baby" going to someone else, I pulled it off and I was blessed enough that I was able to keep it and not feel guilty :) But today I am SO glad I didn't get rid of it because I used it to help make my sister in law's baby shower invitations! Seriously, I love my Cameo (and one of my first videos will be on the print and cut which I absolutely LOVE the Cameo for) but the Imagine is still so useful to me that it's a shame that people don't think they can co-incide :)

I'm not much of a card maker, actually I think it's one of my weaknesses so I was originally going to just print out invites and go on my merry way. But after a couple of glasses of wine (or as my friend Cristina says, more like BIG GULPS of wine!) I decided to just go ahead and make them myself.


 **Don't mind the mess**

  I decided to get organized and start my baby shower invites now so that I can get them out in the mail in 2 weeks (i'm following etiquette!) because I am QUEEN of procrastination. These are the "criss cross" card style and they are super easy to make. I found the tutorial Here!. Each card is made from ONE 8 1/2 x 11 sheet of cardstock so very inexpensive :) I also used the TC Baby Boutique cartridge (it's AMAZING how easily I forget what I have. Actually, when I was wracking my brain trying to come up with a design it was HUBBY who let me know about this cartridge after he saw it on my shelf. He's got a MUCH better memory that me! lol) The background and the little scallop with the saying all come from the cart.
And to make the actual invite, I just printed out on my computer the information and cut it down to sign and glued some gems to the top. I didn't want to make it overly embellished seeing how I have about 20 more to make :) You can tell that I am now in desperate need of a paper trimmer and of course, my Your Story trimmer is no where to be found. ;) Looks like I have a trip to Hobby Lobby in my future. DARN! :)

Happy Hump Day! :)

Sunday, May 6, 2012

Silhouette Gift Card Giveaway!

Hey guys! :) So I have a very busy month of May ahead of me, my sister is coming home back from her last deployment AND I get to plan my first ever baby shower for my sweet sister in law :) To top this all off, I finally received my Silhouette Cameo replacement machine and it has been cutting BETTER THAN EVER! So I was thinking about doing some Silhouette how-to videos because I know how hard it can be to put some of those files together!
In honor of starting my new tutorials, I have a $10 Silhouette store gift card for you so just leave me a comment letting me know what you absolutely love about your Cameo and/or SD and also what kind of Silhouette tutorials you would like to see! :) Have a great weekend!

Saturday, April 28, 2012

Silhouette Cameo- Doll box

So I am attending a baby shower tomorrow and thought this was the PERFECT opportunity to try out this doll box I have had my eye on forever! I bought the file from the Silhouette Online store and then cut acetate for the "oval" window. I just took the window cut and "offset" it so that it would be larger than the cut and I could glue it down :) Isn't it adorable? The box measures roughly around 7" tall and 4" wide. It really is such a cute box :)I also cut the tag on my Cameo as well and that is around 1".
Have a great weekend! :)

Friday, April 27, 2012

Cricut 3D Bows tutorial

A few weeks back I got a few requests from some of my friends to make a tutorial on how to put together the 3D bows that you can get digitally from Cricut Craft Room. I finally got some time and was able to shoot a quick tutorial so I hope that this helps you. These are the gift bows that I used for my Easter baskets. Hopefully this helps you, just click on the link below the picture to take you to the video :)
3D Bow tutorial

Monday, April 16, 2012

Quick Minnie Mouse wall art

Omg.. Now I can blog from my phone! Lol well I just wanted to post a quick Minnie Mouse cut out I made for Julie's bedroom. Like most of you know, Julie is a HUGE Mickey and Minnie Mouse fan So this was definitely fitting :) I cut Minnie using the Mickey and Friends cart at 11 1/2.. These characters are so much easier to work with at much larger sizes :)

Please excuse the Instagram pic :) I accidentally deleted it off my phone so had to find it somewhere :)

She loved it so much that she has asked for Daisy :)

Wednesday, April 11, 2012

Transfering CCR files to Gypsy

Hey guys! Well today I wanted to share a quick tip I just learned. I'm sure a lot of you already know this but I wanted to just make sure ;)

I LOVE designing on Cricut Craft Room but dislike having to connect my laptop to my machines. Call me lazy ;) So I wanted to find a way to design on CCR and then transfer my files to my Gypsy and then just lug my Gypsy. That way I design on a much bigger screen and only carry something small around :)

To do this is really simple.

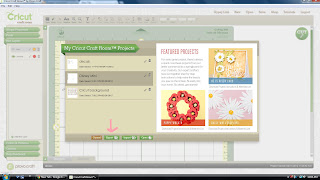
1) Open CCR and design away :)
2)Once finished designing, click on SAVE (just to be sure)
3)Click on Open
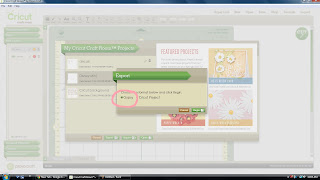
4)Click on the project you choose and click EXPORT.

5)Click on GYPSY

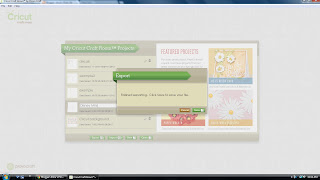
6)Click on Begin and it will say 'Finished exporting- save to your computer'

7)Then name it and save it onto a file in your computer. I like to save mine to Downloads so I remember where it's at.
8)Once it's saved, you will connect your Gypsy to Cricut Sync and then on the projects tab all you have to do is click 'Add project', locate your file and DONE! :)

**Very important** Remember to CLOSE Cricut Craft Room before you attempt to load file to your Gypsy because it will crash and wont allow you to continue. :)

Hope this helps you! Happy Crafting!

Saturday, April 7, 2012

Happy Easter!

I hope you all have a GREAT Easter! While we like to remember what this holiday truly means, it doesn't mean that the Easter bunny doesn't make a quick stop :)

This year I was going to go the lazy way and just buy a pre-packaged basket but was heavily influenced by my FB friends to just get creative instead :) I put their baskets together but I used the Cricut Craft Room 3D Bows and made my own bows.It gave me a great excuse to bust out my Cricut for a bit! :)


Happy Easter!

Wednesday, April 4, 2012

Brag book

So, my mother and I have had a VERY rocky relationship and for the better part of the past 3 years, have barely spoken. Well, this weekend she reached out to me and today we are going to go have lunch and i'm SO very excited. Very, very nervous but excited. So since she hasn't been around much, I thought I would make her a very quick and easy brag book to give her with pictures of my children. When I talked to her this morning she was very excited :)

I took a 4x6 pink Your Story photo cover and added a black piece of cardstock that I embossed with my favorite folder ever, polka dots. :) I then cut out a heart at 2 1/2" from Plantin Schoolbook, added glitter to it using my 2.5" Xyron sticker maker (if you are interested in how I do that, let me know and I can give instructions!), added some toole and some 'bling' and my cover was ready :) I then cut out 7 pieces of 4x6 cardstock for a heavy base for my photos, ran my photos through my NEW Creatopia (LOVE LOVE LOVE IT!) and mounted them. I then used my YS Photo to bind it and done! Not super elaborate but so quick and easy :)