About Me

My photo
I'm Alma, I'm the mother to 2 beautiful boys and a gorgeous little girl. I love God, scrapbooking, shoes, sunglasses, purses and shopping.

My Blog List

Weight Loss 2012

  • 8/1/12- 177.3
  • 8/8/12- 175.0

My Pinterest!

Follow Me on Pinterest

Proud Circle Member!

Grab my button!

Blog Hop
Powered by Blogger.

Tuesday, May 31, 2011

Kindergarten Graduation!

Hi everyone! Sorry, this post is not Cricut or craft related but I wanted to share with you all my son's graduation! It's been a hectic year but we made it and now he has a certificate to show off for his hard work! As many of you know, he has Asperger's but he always manages to overcome his fears and achieve his goals already at such a young age and I couldn't be any more proud! These are some pictures of him at his ceremony and of course, his official graduation pic!


He got so scared when he saw the crowd and we had a hard time convincing him to go up with his class but he was the first one to accept his certificate and he marched proudly as his teacher called his name across the stage and accepted it and stood there for a good 3 minutes before he decides he would rather have the teacher carry him! My poor little guy, I think all the stimulation, noise and crowds overwhelmed him but he pulled through!

Thursday, May 26, 2011

DIY- Blinged up Flip Flops

As many of you know, I LOVE bling. Especially when it's in pink. And while I RARELY wear flip flops (I don't know why, I don't have gross feet or anything and my toes are usually pedicure'd lol) I have been dying to get a pair of flip flops with some of those gems on them but some of them are pricey!

Well, I was working on my algebra quiz and of course my brain started drifting so I looked over and saw that I had a pair of plain ol' pink Old Navy sandals. Then I looked up at my scrap desk and saw the HUGE tub of gems I had just gotten at Hobby Lobby (50% off!) and then it hit me. I could just bling up my own flip flops! I already had all the tools so in the midst of solving linear equations, I started adhering.


The glue I chose to use is the E6000 Industrial strength tube (it's safe for crafting and SUPER sturdy) and best part, it dries clear so no ugly mess. You can find this at Walmart for $2.97. I then just dabbed a drop of glue onto a gem then placed it on the flip flop and thats it! Let it dry and now they are good to go! (I ALMOST posted a pic of my toes in them but I think i'll wait til my fake tan kicks in! ;)


The sandals cost me $2 and the tub of gems were $8. If I were to just take into account that alone, it only cost me $10 but since this tub is HUUUUGE, (I mean, NO DENT what so ever!) I'm sure it truly cost me mere pennies for the gems! Oh and there are gems of ALL sizes and all colors so you can choose whatever color you'd like!

Hope you get inspired to bling something up! :)

Wednesday, May 25, 2011

Giveaway Winner!

And the winner chosen by Random.org is..

TRINITY who said "super cute cupcake card!! and love your "new" pink machines to :)"

I will be emailing you to get your contact info so that you can get your gypsy sleeve on it's way! :)

Thanks everyone for following along and thanks to all my new followers! YOU GUYS ROCK!

Monday, May 23, 2011

Toilet Paper Roll Mini Album


Hi! Well, I finally did it! My very first Toilet Paper Roll Mini Album! I wanted to show you my album and then this week (when i'm FINALLY done with finals) I will be posting up a tutorial! So easy to make and so green! What better way to recycle those rolls than to make them into an album? These are perfect for those little pictures that you just don't know what to do with but don't wanna get rid of it.

I also actually use a program called PhotoSheet that downsizes my pictures so that I can fit 4 wallet sizes into one 4x6 sheet! More on that in the upcoming video as well!


Thanks to all my new followers! I will be posting up the winner this week for the gypsy cover! :)

Sunday, May 22, 2011

PINK cuttlebug!

When I said I would take all of you all on a painting adventure I wasn't lying!! HAHAHA :) Ever since my Cricut makeovers, I've been looking around my craft area trying to figure out what else I could make pink and then someone suggested my Cuttlebug! I figured it would be easy enough for me to try since it's not a $400 machine so I went to work! I taped off the sides then took it into my garage and started spraying!


Some mistakes that he pointed out to me that I could tell where that I shouldn't have sprayed *too much* because I do have a little bit of drip on one corner but not really noticeable and also, TAPE TAPE TAPE!


I will say I did not do as great of a job as Chris (my husband) did, but i'm happy enough and since it looks so pretty, i'm happy! :P


Besides that, i'm proud to show you my new and improved PINK cuttlebug! Matches my machines huh?!?


What else to paint NOW? ;)

Saturday, May 21, 2011

Scrappin With My Bug Birthday Blog Hop!

Hi everyone and welcome to Michelle's Birthday Blog Hop! First of all, let me thank her for letting me be a part of such an awesome line up. As many of you know, Michelle is my Cricut Circle Sister! While the "program" is no longer in effect, she will always be my sister and I am so excited because I get to personally meet her in June! YAY!! :D

Second of all, HAPPY HAPPY HAPPY BIRTHDAY!!!!!!!!! Seriously, she could not be anymore sweeter or talented. If you haven't done so, check out her blog:HERE! She really is AWESOME and cannot possibly speak more highly of her. SHE'S JUST GREAT!! :))


For my project, I wanted to make a card and use what else, one of Michelle (and mine!) favorite things, the Cricut! :)


This card I believe is 5x7 and it's got pink and white bases cut down to size. I made a "rosette" (remember how obsessed i've been?! See Rosette Button Post if you don't remember! LOL It's not perfect but i'm learning! Then I added a cupcake cut from Sweet Treats (one of my fave!), ran the bottom through my xyron, added some glitter then used glossy accents on the cupcake itself. I just love glossy accents because it really makes it pop! I then ran my pink base through my swirly dots Cuttlebug folder on my Cuttlebug (which is now PINK!)hahaha and then added some ribbon. I used the Hapy Birthday sentiment from the Bella stamp set I have had since I was pregnant almost 2 years ago! :)

Now what is a blog hop without a prize? The ladies here are all giving out some wonderful prizes but I will be giving out your choice of either a Green or Orange Silicone Gypsy cover! How awesome is that?! Let me tell you, my Gypsy never goes without a cover!


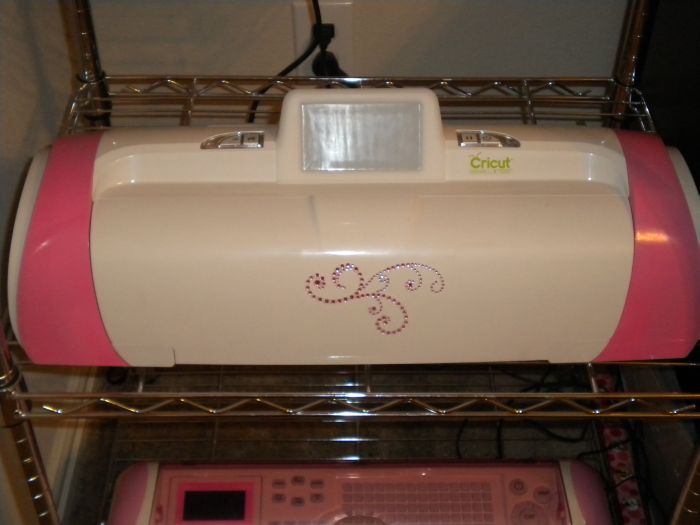
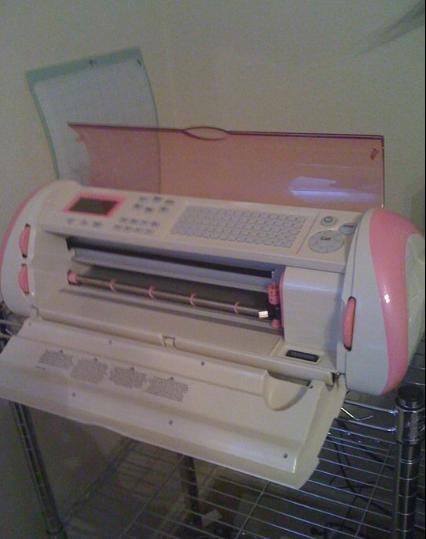
Remember, all you have to do is leave me a comment and I LOVE followers! And I wouldn't want any of you to miss out on my adventures with a PAINT CAN! hahahaha :) Ever since my husband painted my machines PINK (love), I have been walking around the house wanting to paint more stuff my signature color! So far I have had someone dare me to do my Cuttlebug which I did but I will post it later because today is ALL ABOUT MICHELLE! :))

On to your next stop: Crazy about Cricut

Friday, May 20, 2011

Pink E2 video!

**Gonna warn you, I was holding my FLIP camera so its a little shaky!**

Here is a short video I made showing you guys my machines and of course, my small little "Scrap area". :D


Didn't my husband do an amazing job on my E2!? IT'S SO BEAUTIFUL!! Thank you honey! :)


And now a picture of all 3 beauties!

My PINK Imagine!

Sarah over at PinkCricut.com had her husband post a how to video on how to paint the edges of the Imagine pink (or any color you choose) and I finally had the guts to ask my husband to do it! He did such an awesome job I just had to share!! :-)


Doesn't it look BEAUTIFUL and totally fitting now??


Oh and BEST PART YET. He managed to unscrew my E2 green edges and painted those as well! So now all my machines are pink and coordinating! WOOHOO! I'll post pics of those in the morning when they are completely dry :)

Thursday, May 19, 2011

Best Friends card

I'm a scrapbooker at heart but the awesome thing about having these machines at home to play with is that I get to occasionally spoil my friends and family with homemade cards! I am blessed to have the bestest girlfriends ever (even though most of them are all out in Southern California) BUT that gives me an excuse to send them something!

Tonight, while working on my homework, I decided I needed to send my best friend a card. She and I have known each other since we were babies (I mean, she is 2 months older than me so you can say she's known me all my life! LOL) and we were inseperable until we both turned 17. Long story short, we both found out we were pregnant with our first child the same week, my son was born 2 months premature and STILL went home the exact same day her daughter did, her middle child is a girl, mine is a boy and two years ago she gave birth to her first son and last year I gave birth to my first daughter. Oh and in case that wasn't coincidence enough, we are both married to Christophers. =) Yes, we are soulmates. :) I'm blessed enough that I get to go spend a week with her and my sister in July so I wanted to just make her something cute :)


I used my Imagine "Better Together" cartridge for the cutout of the girls. Let me say, this is probably my favorite Imagine cartridge. So girly, cute and sassy! JUST MY TYPE! LOL. I used background paper from a paper stack from Hobby Lobby (I love zebra print in pink!) and cut the top notes from my Imagine preloaded cartridges. The stamp is from Pink Cricut's Animated Greetings stamp which I thought went PERFECT with this! Oh and I topped it off with a bit of twine from the Twinery. LOVE IT! :)

Hope you guys enjoyed my card and make sure you make something for your girlfriends too!

Wednesday, May 18, 2011

Birthday Rosette Button!

First off, I need to give credit to Tammy Skinner for this idea! =) I LOVE LOVE LOVE looking at these buttons at Michaels but figured it'd be so cool to make my own. Well, Tammy posted a quick tutorial on National Scrapbooking Day on them and i've been hooked!


What I did was took 2 12x2" strips of purple glittery cardstock and scored them at 1/2" on my Martha Stewart Scoreboard. I then folded it accordian style, glued them together (and if you see, I need to go back and reglue them) and then bunched it up in the middle to make the rosette part. I then cut a circle from my Imagine at 3 1/2", inked it and cut out the 25 from the Don Juan cartridge at 2 1/2". I ran the numbers through my Xyron and added glitter on top. Yay for bling! :)

I cut the outer scallop from my E2 using the Essentials cartridge already preloaded at 4" I believe (sorry, I forgot to write the measurements down!) and then took a bunch of my FAVORITE colored and patterned ribbon and hot glued it to the scallop before adhering the rosette and that's it! Sounds complicated but I promise it's not! So fun to make and now, I am going to wear it on my birthday which is in early June and I bet you can guess how old i'll be! ;)

I will post a birthday picture that day because I also plan on making a crown from the Once Upon a Princess cartridge and the wand as well. I'm still a teen at heart, luckily my husband puts up with my girliness! =)

Speaking of once Upon a Princess, I've decided that in order to challenge myself, I will be doing series on individual cartridges for awhile. The first cartridge i've chosen to "showcase" is my ALL TIME FAVORITE, Once Upon a Princess! LOVE this cart! Perfect for ANY princess in your life! Be on the lookout for that!

Oh and don't forget this weekend is Scrappin With My Bug's birthday blog hop! LOTS OF PRIZES and stops i'm SO excited! I love that girl! :)

Have a great day!!

Tuesday, May 17, 2011

Winner!

Hi everyone! Sorry about this late post, I have been consumed with algebra and today I was finally able to take a small breather! :)

The winner of this giveaway (chosen by Random.org) is Stefani Chastain!

Thanks to everyone for playing along and for continuing to follow my blog :)

<3 ya guys!

Monday, May 9, 2011

GIVEAWAY!!! :)

Well, Guess what??! Time for another giveaway! :)

No special reason, just had an extra Imagine More Cards Cricut Imagine cartridge lying around and decided instead of selling it, how about just giving it away??

If you have an Imagine then obviously, you NEED this cart and if you have an E2, you need it too! It has some great cuts on it and I absolutely love it!


All you need to do is:

-Be a follower
-Leave me a comment under this post!
-Tell your friends for extra entries! :)

That's it! Easy peasy! This giveaway is open until next Monday, May 16th at midnight! :D

Bath time Layout

Hi everybody! I hope you all had a great Mother's Day whether you were celebrating for yourself or you were honoring a special woman in your life! Mine was great :)

I don't know about any of you, but I do most of my scrapbooking when I'm trying to get other things done! For example, the other day we were suppose to be out the door by 5pm in order to make our dinner reservation and at 415pm I decided (right before I hopped into the shower mind you!) that I wanted to work on a scrapbook layout! lol You see, scrapbooking is where my heart lies, the reason I even got into Cricut and all things paper crafting so I've been a little bummed that I had fallen behind on a lot of my pictures. So as I'm scrambling I lay out a yellow piece of 12x12 cardstock, jump into the shower, in my pink VERY COMFY AND FUZZY bathrobe I sit down right after and mat my pictures. I then get ready and in between putting on my shoes and dressing my kids, I'm laying things out. Yes, this is how I get my stuff done. I guess I work my best under pressure because I am queen of procrastination! ;)

Anywho- so I wanted to show you my layout that I finally finished tonight. It's a bath time layout of my daughter trying out her rubber ducky bath tub for the first time! I cut out the little girl in a rubber duck bath tub from Cricut Decals that came on my E2 as well as that little scalloped rectangle that holds the title. The title is VERY simple, I just didn't have time tonight to cut out small letters so I stamped the title on with some Staz On ink :) The pictures were matted and inked around the edges and the journaling was typed on Microsoft Word and printed on vellum. I LOVE VELLUM!! <3 Then I attached it with some brads and that's it! Simple but super adorable and the best part is that I am one layout closer to catching up! :)


Tomorrow I will be posting up my video of a walkthrough of Memory Lane! Have you ever just sat down and looked through your very first albums? I did tonight and I can't believe how much my style has changed! I rarely do videos but I wanted to show you guys my albums :)

Saturday, May 7, 2011

Quick Tip. Stamps and scraps :)

Ok, I don't know about all of you, but while I have some awesome kids, they have about the same attention span as a goldfish (or whatever other animal with a SHORT attention span!) lol so I am always having to find new ways to entertain them, especially when we go out to eat. So I'm just gonna share a quick tip with you.

What I do, is take a stamp and stamp it into small little 2x2 pieces of scraps I have leftover. (Preferably white). I then take a box of crayons with me and that's it! My kids LOVE to color and i'm not driven so crazy ;)


Have a GREAT Mother's Day!!!

Monday, May 2, 2011

Cricut E2 and.... ;)

OMG! I have had the craziest weekend but i'm SO excited because yesterday I was able to get my hands on my ULTIMATE want, which is the pink Expression! Michaels has them on sale for $229 and I was able to sell my Pink Journey cartridge that it came with so I'm just had to have it! I sold my older Expression last week to "fund" for my new E2 but I just couldn't say no to the pink machine. While I am loving the new E2, I almost had a sense of relief as soon as I had my hands on another "original" Expression, I didn't feel so naked anymore! ha :)

So I wanted to share with you all a cut from the IMAGINE cartridge (that you can CUT with the E2). I cut this little girl from the Best Friends cartridge and I wanted to show you what an Imagine cut looks like. I was so confused as to how this machine would work with Imagine cartridges because to me, the whole point of the Imagine is to print and without the printing you weren't getting any of the details but I LOVE how this turned out! Just like a regular Paperdoll from EveryDay Paperdolls and I used a Peachy Keen Stamp for the face. EASY PEASY!


Have a great Monday!!!